Golang for Rubyists. Part 5. How to start applying Golang to AWS Lambda
In the company I work for, we recently started using Golang for lambda functions development, to replace domination of Node.js ones and with a hope of getting better performance and development speed. I can just say that so far things run smoothly, and I will have a more thorough post about lambdas development on Go on the company blog. And here I will help you get started with it, create your first function and deploy it to the cloud.

Few words about myself for those who just came across my blog. I am a software engineer with almost a decade of hands-on experience. My main instruments were always Ruby and Javascript, despite that I played around with different languages and technologies, such as Clojure, Swift, Python, Java, Brainfuck, and others. Now I am on my path for learning Golang and applying it to the company’s production environment and my blog posts series is focused especially on those who have a similar experience, switching from more “scripting” languages to Go. Let’s begin. If you will follow my instructions, in the end, you will have a lambda function, up and running on AWS and written in Go. In order to achieve this goal, we need to prepare an infrastructure. The best way to do this is using a Terraform if you want to follow this path - I suggest first read through this post and then go and check one of my previous ones to implement the same in Terraform. Not all the practices I will be showing here can be considered as being “best”. I assume that you’re following my blog (you can do this via twitter or just RSS), so I will address them in the future. Go to your AWS console -> AWS Lambda -> Create new function. Then add some function name, Go as a runtime, role from a template, role name, and as a template choose “Basic Edge Lambda permissions”:
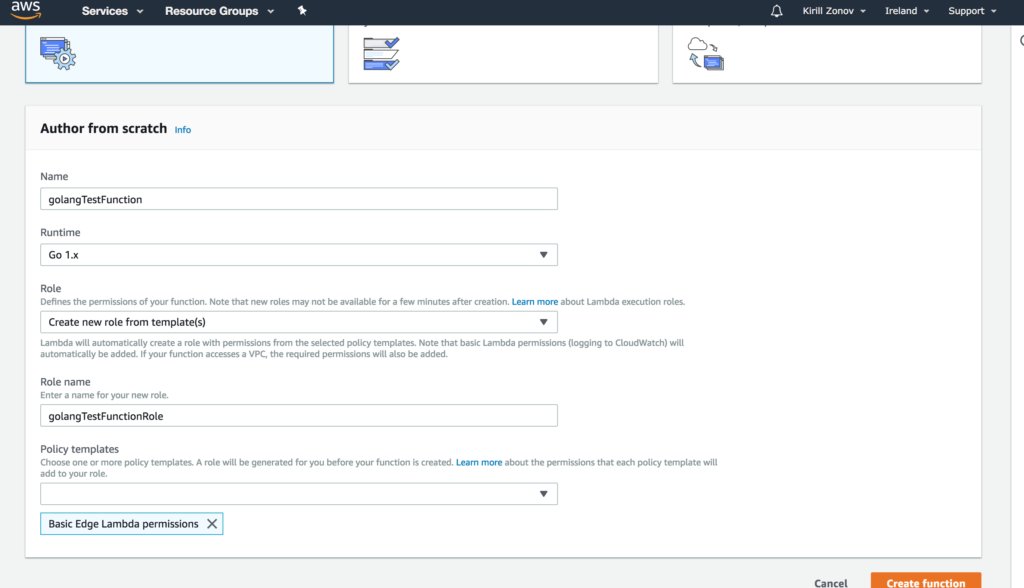
When it is done, click on “Create function”.
If you have experience with NodeJS lambda functions - these steps are absolutely familiar to you, you can do the same, using, f.e. Terraform. If you have just Ruby experience, most likely you’ve never done this before, I hope that this explanation is enough.
Now your Lambda function is created, but as the opposite to JS lambdas, you cannot use AWS’ integrated editor (cloud9) to write code. Instead, we should move to the console and create a new folder there with a file main.go.
Now copy and paste the following snippet, it is just a boilerplate and I will explain in a second, what does each line mean there:
(just as a side note, if you’re using Atom, I highly encourage you to install Go-plus plugin, which will make your Go development experience much smoother)
package main
import (
	"github.com/aws/aws-lambda-go/events"
	"github.com/aws/aws-lambda-go/lambda"
)
func Handler(request events.APIGatewayProxyRequest) (events.APIGatewayProxyResponse, error) {
	return events.APIGatewayProxyResponse{
		Body:       "Hello, World!",
		StatusCode: 200}, nil
}
func main() {
	lambda.Start(Handler)
}
If the overall syntax is too unfamiliar to you - welcome to the start of this posts series, where I explained “package” and “import” constructions. Here I will give a more shallow explanation.
So, first we define the package name, then we import the only needed packages we need in order to make this function work, and they are not in your system yet, so hold on, we will install them later. Then we create a basic function, which will be receiving events, which can be different sort of them. As you may see, here I specified that the event format should be a request object from an API gateway and the response is, respectively, an API gateway formatted response (and an error as a second argument). About an error, pay attention here, if you need your lambda function to return some sort of meaningful error message to the API Gateway, you should not use this error object, but build one with a proper error code in your response.
Next we just immediately return from a function, providing an APIGatewayProxyResponse object with a basic body and successful status code. As a second argument to the return, we pass nil, as you see, which means that no unexpected error happened.
The last part of this snippet is a main() function, which will be an entry point for the Lambda and which will just start your function listening, with Handler() as a listener.
Now when we understand the structure of the function, let’s deploy it. First, we need to compile it. Go to your terminal and execute GOOS=linux go build main.go or env GOOS=linux go build main.go if you’re in FiSH. Unfortunately, you’ll get an error, that you don’t have packages installed.
It is extremely easy to fix, just as you do in Ruby or any other language: go get github.com/aws/aws-lambda-go/events github.com/aws/aws-lambda-go/lambda. After that try to build again and you (I hope) will succeed. Did you notice this strange goos constant at the start of your build command?

It says that the Go binary should be compiled for OS Linux, nothing geese related %) On of Go’s beauties is that it optimizes its binaries for specific OS’s and even if you’re on OSX, you can compile your binary to be used on Linux, which AWS Lambda uses.
Now it’s time to pack your binary and deploy it: zip main.zip main. (aw, yes, it was just a packing, we have to deploy it manually). Obviously, in the production environment you will never zip and upload your lambdas manually to the AWS Console, but it is perfectly ok for our educational purposes. So, go back to your browser tab, and now we have a few things interesting for us:
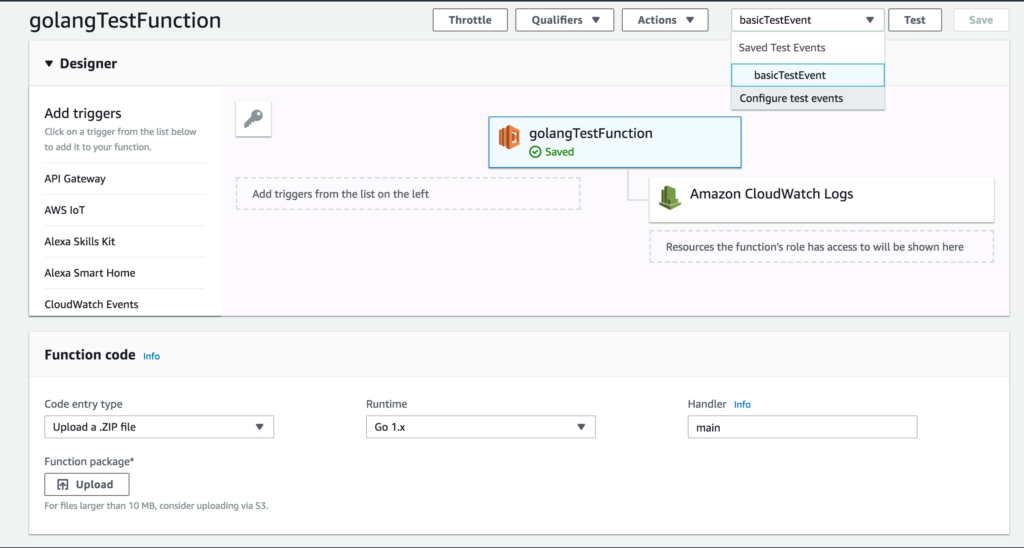
- Change Handler to be
main, which is the name of your package. - Upload your newly created zip and then click a big orange button
Save. - At the top, click on Configure test events -> Create new test event. As an event template choose API Gateway AWS Proxy. It will provide you a huge request object. We don't need to modify anything there, so feel free to just save it. (yeah, it is bloated and we don't really need 80% of it, it just out of the scope of current post).
Now it is the most exciting moment, select this test event on the top and click Test. And I truly believe that after a second or so you should get such a beautiful green flash message:
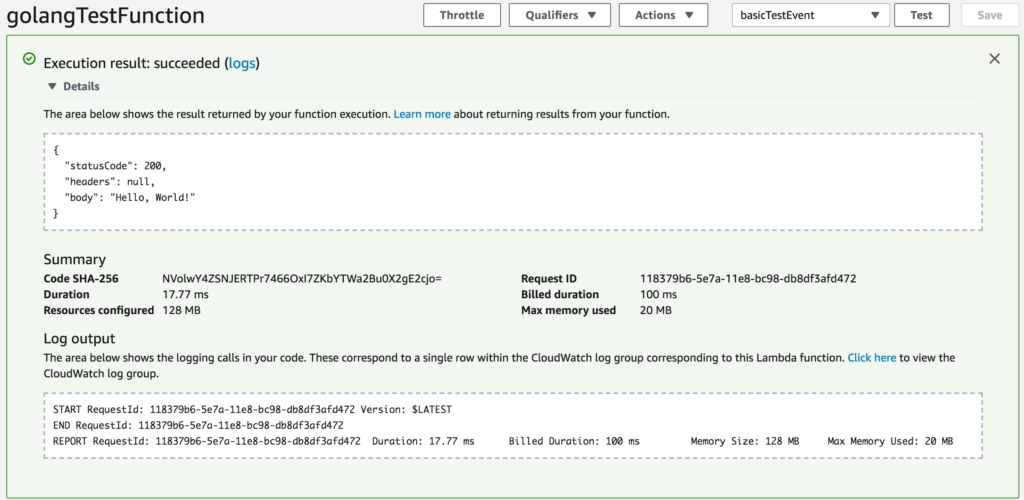
Yay, it works! I love when something works. I think most of us start an engineering career because we love when smth starts working. Either a mom’s television, you accidentally destroyed with your electrical experiments and then trying to fix or a lambda function. Same thing. This is it for today, stay tuned, in the future posts I will cover dependency management for Golang, goroutines and, obviously, testing. And even more cool stuff. Ah, and I almost forgot, feel free to share it or even buy me a coffee (big orange button at the top), I am really addicted to it %) See you soon!